
Holography
Holography is photography in three dimensions and more! It was first proposed and the basic theory developed by Dennis Gabor (1971 Nobel Prize for this work) in 1947 as a tool to improve the resolution of the electron microscope but did not really amount to very much until the development of the laser in the 1960's. Gabor named it from the Greek words for whole (holos) and message (gramma). In 1964 Emmett Leith and Juris Upatnieks of the University of Michigan made the first hologram (of a train and a bird, seen below), a true three-dimensional image of the original objects.
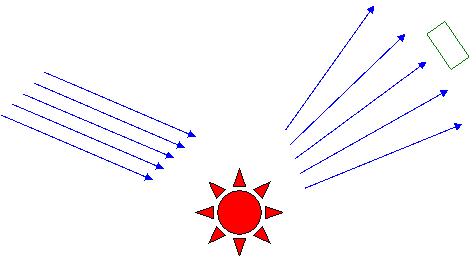
We start our discussion by discussing the basics of ordinary photography to later be able to contrast it with holography. In normal photography light, typically from the sun or a flash, is diffusely reflected from the objects in the scene and the camera's lens forms an image of the scene (see the figure below) on the film. Averaging the detected intensity at each grain in the film over the exposure time, the film records a two-dimensional image of the original scene. Why are ordinary photographs only two-dimensional representations of the original scene? After all, all of the light that your eye would see at the location of the camera as a three-dimensional view enters the camera. So what is it about the film detection that does not allow a three-dimensional view of the object scene?
Recall that light is a wave that has both an amplitude and a phase and that its intensity is proportional to the square of the amplitude. When film records the intensity of light, all the phase information contained in the original light reaching the film is lost. The film is what is known as a "square-law detector," recording only the intensity of light reaching it, with each grain averaging that intensity over the exposure time. There is no recording of the relative phases of the different rays arriving at the film.
Given this discussion, how do our eyes see in three-dimensions, since the photoreceptors of our eyes also are square-law detectors and lose the phase information as well? We have depth perception because we have two eyes and a brain. Our two eyes train our brain to look for signs of depth and even if one eye is damaged later in life we have learned to look for these signals and so do not lose our depth perception. If you have ever tried to view "magic-eye" or stereogram pictures to see in three dimensions you have directly experienced depth perception in its simplest form. Each eye, when "focused at infinity" or relaxed, sees a different view that has been created to reconstruct a three dimensional scene. Try it!!

Holography is a method to record both the amplitude and the phase information in the light wave that reaches the film. There are a number of variations of the basic method, but all holography requires laser light (strictly speaking light that is coherent over the object to be imaged) in order to construct the hologram. Some variations of holography do not require a laser to view the hologram while others do. The process of holography has two steps: recording the information on the film, (developing the film, just as in normal photography,) and then reconstructing the three-dimensional image with either laser light or with white light directed at the proper orientation.
Let's first discuss transmission holography. The first step is the recording of the interference pattern formed between the sample beam, which diffusely reflects from the object and the reference beam which is sent directly to the film. These two beams must be coherent and are normally obtained from a single laser by splitting its beam. Note that there is no lens used to form an image of the object from the sample beam, but this reflected, or scattered light, is directly mixed with the reference beam. The idea behind this method is to capture the full information present in the light waves of the sample beam as they arrive at the detector using the reference beam as a way to store not only the amplitude information, but also the phase information. Some of the basic physics of holography is discussed in a section just below. When the film is developed (the developed film is called the hologram) and examined directly by eye, it does not look at all like a normal photograph, but is simply a complex interference pattern of light and dark bands in complex shapes and bears no direct resemblance to the original objects. In order to have the fine detail needed to later form clear detailed 3-D images, the film must be very high resolution film which allows interference fringes with spacings of less than one micron, comparable or better than the wavelength of light.

Once the film is developed, the hologram is ready for viewing. For a transmission hologram, reconstruction is done by "playing back" the reference beam with the same orientation to the developed hologram as it had when the hologram was made and viewing the image as shown below. What is seen is a virtual image that appears three-dimensional. The interference pattern on the film diffracts the reference beam - known as the reconstruction beam now - to produce a light wave that duplicates the original beam that was scattered from the real object, complete with all amplitude and phase information. Further, the developed hologram acts like a window glass so that if you move your eye around and examine different portions of the diffracted light you will see different views of the virtual image of the object, all in 3D. So, even if you were to cut up the hologram into pieces, if you looked through one piece you would see a view of the entire object from the perspective of that position on the original intact hologram and not a view of only a portion of the object.

Holograms have extremely high information content since the interferogram, the recorded interference pattern on the film, is of such high resolution. Two types of film responses can be used to store interferograms: amplitude or phase. In the former, the very fine silver grain deposits on the film lead to optical density changes and the interferogram interacts with the reconstruction beam through different levels of absorption producing the diffraction, while in the latter, the film is developed and then bleached to remove the silver deposits leaving only variations in the index of refraction of the film as the information content of the interferogram. These phase holograms are used most often since they are much more efficient in transmitting most of the reconstruction beam when diffracted from the phase variations in the bleached film.
Wave fronts can be very useful in picturing how the phase of a wave may change as it reflects or as it refracts. All points on a wave front are points of equal amplitude (equal disturbance) that move in space in unison and undisturbed, unless different portions of the wave front go through regions of space that have different properties. In that case the wave front distorts its shape, so that still all points on it retain their "equal amplitude" condition.
Consider, for example, when a plane wave front arrives at a rectangular piece of glass that is cut so that a central section of it is thicker than the side portions, as shown in the following diagram. Because light travels slower in glass than in air, as the wave front enters the glass it slows down. Then the portion of the wave front that travels through the thinner section of the glass emerges prior to the part of the wave front traveling in the thicker section. The portions that get out of the glass first "separate" from their former neighbors because their speed increases; this causes the wave front to get distorted. In the language of phase differences, then different sections of the wave front end up with a relative (spatial) phase difference.

Notice that as the plane wave (blue lines) enters the glass slab it remains a plane wave, but the wave fronts travel slower. As a result, the distance between two consecutive wave fronts, say those representing the points of maximum disturbance, decreases (in this diagram this is shown to decrease by a factor of 3, for instance). The wave fronts shown in green, red, violet, and purple demonstrate that the emerging portions in air have moved far more than their counterparts that are still in the glass. Finally, the portion of the front that is in the thick part of the glass emerges, but far behind the sections that had emerged from the thinner glass sections (this is shown in blue). So, the variation in the thickness of the glass causes a distortion in the wave front; or, equivalently, the variations in the thickness of the glass cause a (spatial) phase change in the wave front. This is also shown for a more familiar case of a plane wave passing through a converging lens, below:

In both of these cases (above two diagrams) the wave front "distortion" occurs for light that travels from left-to-right just as it does for light that travels from right-to-left. For the lens, this is the reciprocity relation that we already examined using rays (also shown in the lower diagram). That is to say, a converging lens turns a plane wave into a spherical wave and visa versa. In fact, the ability of the lens to change the phase of a wave front, and thus to distort its shape, is what makes the lens useful for image formation. (As we will shortly see discussed below, the same thing happens for diffraction from a so-called zone plate.)
Similar wave front distortions occur for light that reflects non-uniformly from surfaces. This is most easily visualized for a plane wave front (blue color profile) that reflects from an array of plane mirrors (black with dashed lines showing the silvered back of the mirror) that "lag" in positions with respect to each other, as shown below:

Notice that the portion of the wave front that reflects from the indented (middle) mirror ends up with "twice the lag". As a result, the wave front receives a "double distortion". Moreover, the amount of distortion in the wave front is directly related to the "depth" of the indented mirror. But the wave front's distortion is nothing more than the wave's spatial phase variations. So, reflections from mirrors that are arranged at different depths produce wave front distortion that is the same as phase shifts of the light rays. This is one of the primary points required for understanding how holography works! (This spatial phase change should not be confused with the phase shift associated with mirror reflections - a distinctly separate effect that we do not need to concern ourselves with presently!)
In holography these phase shifts are recorded through the phenomena of interference. Therefore, a hologram records depth variations of the reflector (the object that reflects the light, i.e. the subject of the hologram) by recording the spatial phase changes that they produce in the wave front. To see how these phase changes are recorded and how they are reconstructed to allow us to view the holographic image, consider the most simple hologram which amounts to just a slight variation of the above mirror arrays. But this time let us consider a mirror array that is made of a collection of vertical and angled flat mirrors, as shown in the diagram below. This arrangement, incidentally, is called a reflective diffraction grating:

Here, these mirrors are illuminated by a plane wave of light traveling from left to right. But in this drawing instead of showing the plane wave fronts only the reflected light is drawn. The blue bundle of rays show reflections from the vertical mirrors and the red ones show reflections from the angled mirrors. Notice that different rays in the red bundle travel paths of different lengths because of the lag produced from reflecting from different depths (remember the incident plane waves enter horizontally from the left.) As a result, each of these rays has a different phase with respect to the rays in the blue bundle. In regions of space where the blue and red rays overlap, their phase differences produce interference. Because of the uniformly repeating vertical and angled mirrors, the interference pattern that results will also be uniformly repeating. This is shown in the left diagram, below. In this diagram a snapshot of the two reflected wave fronts is shown, each as dark and light lines that represent the peaks and the valleys of the wave. What is interesting to note is that if we were to place a screen (shown in red) in the reflected beams, then the regions on the screen where two peaks or two valleys coincide ( + +, or - - ) and those where a peak and a valley coincide ( + - , or - +) will remain unchanged with time! In particular, if we were to place a photographic plate instead of the screen, then where the waves add constructively ( + +, or - - ) would develop as "white" and where the light waves add destructively ( + - , or - +) would develop as "black". When developed, this photograph (really a hologram, known as a holographic grating!) will just show repeating dark and light lines, as shown below on the right.

Notice that for these interference effects to form the phase variations, the mirror depths must be comparable to the wavelength of the light. Also, the light source illuminating these mirrors must be coherent, as in a laser (Why?). What happens when this photographic plate (hologram) is illuminated with a plane wave. similar to one of the ones that generated it? We know that light diffracts when it strikes obstacles whose dimension is comparable to the wavelength of the light, and that's exactly the situation here. The diffracted light generates plane waves at the exact same angles that generated the holographic grating, but by symmetry we will now have diffractions both up and down, as shown below, as well as a transmitted beam.

So, a laser beam incident on this grating would generate three beams; a non-diffracted beam and two symmetrically diffracted ones. (Actually, there may be more than two diffracted beams, to be strictly correct; but that's not the point of this discussion. What is more interesting are considerations of energy conservation and reciprocity!)
Now, what if instead of combining two plane waves, as we did for interference due to a reflective grating we were to create an interference pattern between a plane wave and a spherical wave front? This will result in an interference pattern on the photographic plate made of circles that get closer and closer as they get larger. In the jargon of optics, this is called a zone plate.


When such a zone plate is illuminated by an incident plane wave, it will generate, in addition to a transmitted plane wave, diffracted wave fronts in both directions, but now one of these converges to create a real point source on one side of the zone plate while the other diverges, so that it appears to originate from a mirror reflection of the real image, on the other (incident) side of the plate. This apparent image, or (as we've already discussed with the images formed by lenses) the virtual point image, is the hologram of the original point source that created the spherical wave front! What does this mean?

The above diagram shows the cross section of our zone plate, that was developed using a point source and a plane wave, now illuminated from left by a plane wave. Part of this plane wave will pass through our zone plate undiffracted, part of it diffracts to generate spherical waves that converge into a point on the right of the zone plate and create real point image, and still another portion of the incident wave diffracts as spherical waves that diverge away from the zone plate (shown as larger circles). These diverging spherical waves appear to originate from a virtual point source as if located on the left side of the zone plate. An "eye" looking at the zone plate from the right and at say the one o'clock direction would see a point source located on the other side, a mirror image of the real point image.
There are two interesting points about this image formation. First of all, the "eye" need not look from the one o'clock direction. In fact, no mater what angle the eye looks at the zone plate from, it will see the same point image located in the same position. To the eye, then, there is a point source behind the zone plate, just as when it looks at a point source located in front of a plane mirror and sees its image. That is to say, as the eye moves about the zone plate, it sees a point source behind the zone plate. Of course, there is no such point source! In fact, on the left of the zone plate there is only a set of plane waves, say from a collimated laser beam! So, this zone plate is a hologram. The second interesting point is that if we change the collimation size of our illuminating laser light (i.e. the actual size of the plane waves) the eye would still see the same point image on the left side of the zone plate. Of course the brighter the laser beam and the larger the portion of the plate that it covers, then the sharper and brighter will be the observed point image. But its location will not change. This, of course, has to do with the fact that all that it took to create such a zone plate was the interference of a set of plane waves with a second set of spherical waves. It did not matter what portions of these waves interfered on the zone plate. This explains why it is that, unlike a common photograph, if you tear off half of the zone plate you still get the same image.
Now, what if instead of one point source we had used two point sources, say one closer to the photographic plate than the other? Clearly we would end up with interference of the plane wave with each of the two spherical waves separately. What is most crucial for creating these interference patterns is the relative phase of each spherical wave with the plane wave. To keep this phase difference from changing with time we could use a portion of the plane wave to illuminate two pin-holes, which would generate the two spherical waves. In this way, then, the relative locations of the pinholes would be "recorded" in the hologram as phase variations with respect to the plane wave. (Why is it that the phase difference and the interference of the two sets of spherical waves each originating from one pinhole does not matter in this discussion?) When this hologram is illuminated by a plane wave and viewed, the individual virtual images of the two pin-holes will be seen separated from each other and at the proper depths just as the original pinholes that generated them.
Well, if you follow all of the above discussion, then you understand how a hologram works! After all, the object beam is just the incoming plane waves that are reflected from every point on the object as if it were a continuous collection of point sources. In the sense of zone plates, then, the hologram is a collection of the interference of the plane wave of the reference beam with a multitude of spherical waves each of which originates from a single point of the object. When this hologram is recorded, illuminated by a plane wave, and observed from the other side, a virtual image of all of the point sources, i.e. the object itself, appears. This image can be viewed from any angle. Each angle of view shows a separate perspective of the object, just as when viewing a three dimensional object. This is so because the relation of each point on the object with respect to the photographic plate is fixed by its spatial phase difference with respect to the reference beam. This phase difference is, of course, a measure of its position with respect to the photographic plate, the same as in the case of the images of the two pinholes discussed above.
In summary, then, a hologram is a record of the interference pattern between a fixed reference plane wave with spherical waves. These spherical wave fronts originate from reflections of the same plane waves of light illuminating a portion of the object. Thus their phase difference with respect to the plane wave fronts is a measure of their spatial orientation. In this way, spatial "depth" is transformed into phase difference and is recorded in a hologram as interference patterns. Because each point on the object sends spherical wave fronts to the photographic plate, this complex interference pattern recorded at the plate has a signature of all of the object at any location on the plate. So, a small portion of the hologram can reveal the whole picture, albeit at the expense of reduced resolution and contrast.
Variations of holography
Note that transmission holograms must be reconstructed with a laser beam. A second type of holography, known as a reflection or white-light holography, does not need a laser to reveal its 3D image, however these, as all holograms, must be made using a laser. These holograms are made using the set-up shown below in which the transmitted beam through the film acts as the reference beam while the reflected light is the object, or sample, beam. The interferogram in this case is formed through the thickness of the film and the reconstruction of the image is as shown on the right. The 3D virtual image is seen in the original location of the object when viewed as shown. For this type of hologram the entire film is needed to reconstruct the image, but white light can be used since only the right wavelengths will be diffracted by the thin layer of interference patterns to produce the 3D image. We will make these holograms in a laboratory exercise.

In a clever variation of reflection holography, known as multi-colored holography, if three different colored laser beams are sequentially used to create interferograms of the same object on the same film without any vibrations or movement in between, then when viewed with white light the 3D images will be multi-colored. The white light used in the reconstruction will have different wavelengths diffracted from corresponding interference patterns made with the corresponding wavelength laser light and when viewed by eye, multi-colored images are created.
Another type of white light hologram is known as a rainbow hologram, essentially a hologram of a holgram. First, a normal transmission hologram is made and then the holographic image from this is used as an object to make another hologram, but viewed through a narrow slit. The slit removes the necessity for reconstruction with a laser, but it also only keeps the 3D information along the direction of the slit. Perpendicular to the slit, when moving your eye in this direction while playing back with white light, there is no parallax or 3D effect, but the white light is dispersed into a rainbow of colors as your eye moves. These can be made into moving images by recording separation strips of holograms from individual time frames and piecing them together so that as your eye moves along in the direction of the slit different frames are seen and the 3D image appears to move.
So, what are the major requirements for making holograms? Obviously first a laser is needed to have coherent light that can keep track of the relative phases of the reference and sample beams. A second important requirement is the elimination of vibrations or motion during the exposure of the film to light since the detailed interference patterns would be washed out if these were present. In addition, special high resolution film is needed to record the interference patterns. One way to reduce the vibration problem, or to "freeze" motion of an object is to use relatively high powered pulsed laser light to capture an object in motion, in a similar way to the directly viewed object illuminated by a strobe light.
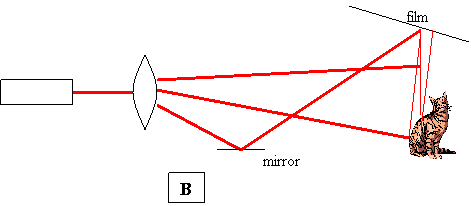
Let's next consider some actual schemes for obtaining holograms of different types. Perhaps the simplest way to make a transmission hologram is shown first in A. The single, diverging laser beam partially shines directly on the film and partially scatters from the object to produce the hologram. This method does not allow "front lighting" of the scene. A modified version, shown in B, does allow for front lighting of the object, as does a two-beam arrangement obtained using a beam-splitter and shown in C. With another variation of scheme A a full panorama shot - 360o around the object - can be obtained using scheme D. For completeness, the reflection hologram scheme was already shown above.


We next turn to some (non-art) applications of holography in a variety of areas.
First, let's consider holographic interferometry techniques, the use of laser holography to examine small vibrations or distortions of an object. Three different methods are used to do this. In the first a hologram of an object is made and reconstructed in the same location without removing the original object. A viewer will see both the hologram of the object and the actual object at the same location so long as the hologram was mounted in the identical location after developing it. If the object is deformed or moved in any way, there will be interference fringes observed from the interference of light from the hologram and the object itself. Displacements as small as 0.3 mm can be seen using this method. The object may be examined under the influence of pressure, heat or to check its stability or look for small motions. Under the influence of these external agents or because of its motion, a time-varying interference pattern will be seen. This method is known as real-time holographic interferometry, because the patterns seen are observed directly as the object is distorted or moved. Another way to examine these effects is to make a double-exposure hologram, in which the time-delay between exposures can be adjusted in order to look for distortions or motion of the object. These holograms show contours of maximum changes in the shape of an object. Yet a third method involves a time-averaged hologram where a single longer exposure is made while the object continuously undergoes some periodic motion. This method is good for examining the spatial characteristics of low amplitude vibrations since faster, larger amplitude motions give less contrast since they are washed out. This technique is best for examining standing waves of various kinds, for example in the study of standing wave patterns on string instruments. See the web site on Musical Acoustics and Holography.
A second application of laser that is much more widespread - in fact nearly everyone in this country has seen one, usually on a weekly basis - is the holographic scanner used in supermarkets and large stores to scan bar code labeling on packages. Bar codes are standardized Universal Product Codes (UPC) stripes with the first five coded for the manufacturer and the second five coded for the product. Holographic scanners use a spinning CD-like disk to diffract a diode laser beam in a patterned path as the disk spins. The reflected light from the bar code region is detected and analyzed by a photodiode and the code is deciphered and used for pricing and inventory.
The CD-like disk used in a scanner is actually one type of a class of holographic optical elements (HOE). These are specifically designed hologram that can be used as lenses, beam-splitters, spectral filters only passing a narrow range of color, etc. Many of these functions can be combined in one by multiply exposing the holographic film when being made, so that, for example, one type of HOE can act as a colored filter/lens combination, or a focused beam-splitter. They are light-weight, very thin, but can be made large and cheaply. One example application of these that is becoming cheaper and more widespread is a head-up display used currently in the windshields of airplanes and high-end cars. These displays allow one to keep focused on the outside world while driving, but to clearly see a display of controls with a relaxed eye, rather than having to focus on the windshield itself to read the meters. This type of display is finding its way into special glasses for medical surgeons to view other information while focused on their surgery. They work by projecting images onto an HOE in the windshield that acts as a narrow band reflector, transparent except for a narrow color range that is reflected.

The last application of holograms that we will discuss is information storage. In a high resolution phot digital (binary - light or no light) information can be stored at around 10,000 bits per square mm - about the size of a pinhead. This means that each bit requires an area of about 10 mm x 10 mm on the film. In a hologram, in principle one can store digital information with a resolution of about the wavelength of light - or about 0.5 mm - but information can be stored in three dimensions, not just two - by storing information throughout the thickness of the film also. This means that in a 1 mm x 1 mm x 1 mm cube one can store about 1010 bits of information, equivalent to about one volume of the Encyclopedia Britannica in a 10 cm x 10 cm (about 4" x 4") hologram. Other advantages include the fact that surface scratches and dust on the hologram do not strongly affect reading out the information and also that the information can be read out in a parallel mode using an array of photodetectors so as to made much faster access time to the information.
![]()
